
WHAT’S THE BEST CAMERA FOR RECORDING VOLLEYBALL MATCHES?
That’s a great question! Editing volleyball recruiting videos as I do, I receive a lot of footage from a wide variety of cameras as you can imagine. There are certain elements of the footage which are really useful for highlights and recruiting purposes - and these tend to be the type of shot as opposed to the type of camera.
What I mean by this is that a nice stable, wide shot, seeing the whole court and all six players on your player’s team, and how they move both defensively and offensively is really key, and what coaches want to see.
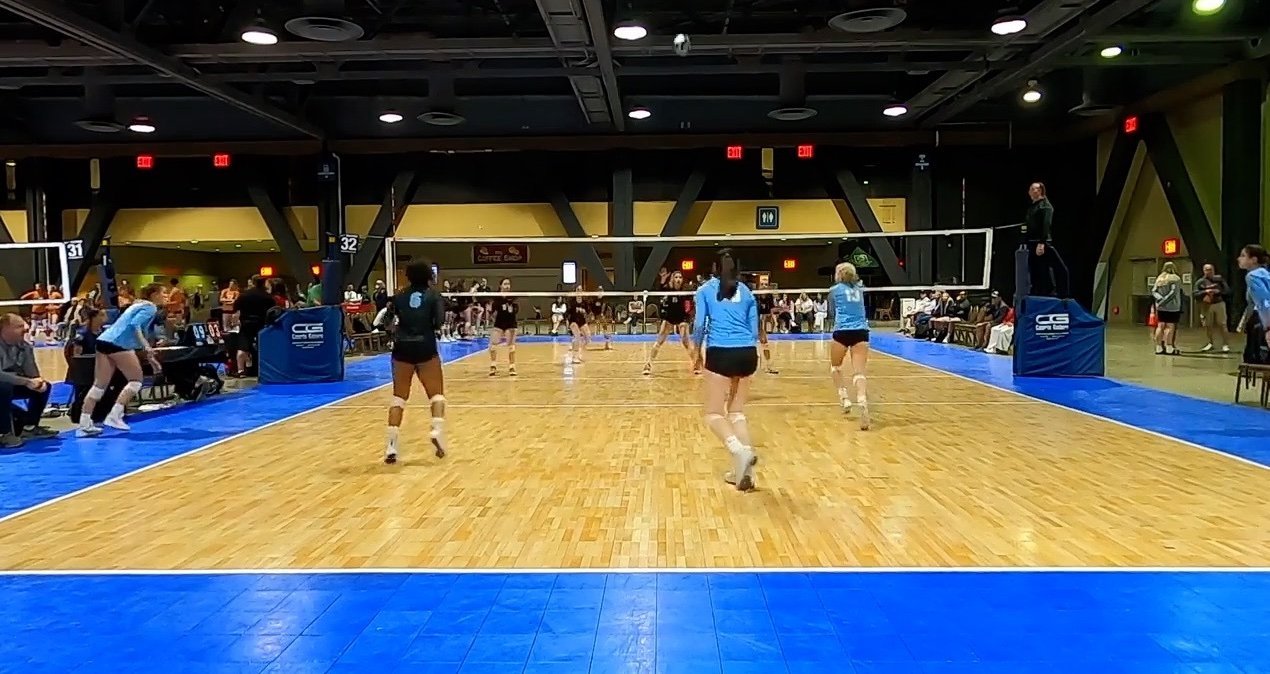
Photo above: Camera view of volleyball court from the end line probably at head height while seated.

Photo above: Camera view of volleyball court from elevated camera - probably about 7 feet in the air (see the line judge’s head height). This is great for being able to see all the players on this side of the court.

Photo above: Camera view of volleyball court from player team side of court from bleachers. We see the whole side of the court.
It’s also best to be on the same side of the net as your player's team, so making “the walk” is worth it in the long run.
I have found that elevated camera angles can obtain this footage the best from behind the baseline, or to the side. The elevated camera allows people to walk underneath and not get in the shot, and also helps see a front row player who may be visually blocked by a player in the back row. So if you have a tall tripod, or have access to stable bleachers - this is a good option. Elevated can be anywhere from standing eye-level, to 8-10 feet in the air on a tripod. Obviously one needs to consider camera control when opting for either of these heights.
So, what camera would you recommend?
Obviously, the better the image you start with, the better the final product is going to look. 4K video is nice, and it creates beautiful and large video files - which over the course of a day/tournament/season - can possibly be a challenge to manage if you are not accustomed to working with large files - so you may want to opt for shooting in HD. I have found that the HD 1080 setting is a nice balance between quality and file size.
This being said, a big consideration is ease of use for you. If you are intending to record every match, or many matches - it’s best to have a camera system that is easy to set up, record video with, and carry with you. I think any of these options below are viable, and one needs to consider what will work best.
Learn about my premium edit services for volleyball recruiting videos.
Players highlighted, 3-4 minutes, and turnaround in a week or less.
Cell phones
Phones record amazing video now, and they continue to improve. Most of us have phones with us already, so they are a viable option. The phone system can be compact and easily set up. Add a small tripod with phone holder, and an extra battery and you have a nice portable system for recording court-side.
* A phone is also a great option for recording clips of your player in a pinch, or if you are recording selective times or plays. These can be used in a recruiting video - either in part or as the sole source of footage. It’s easy to record handheld with a phone from the sideline, and follow your player. This can generate some nice close footage.
Pro’s:
Easy to carry with you
Nice for quick shots, or for shooting handheld
Can easily upload to social media
Nice system with a tripod and additional battery
Con’s:
Possible interruptions from phone calls/texts
Uses battery
Not the most visually stable
Can fill up phone storage
Tablets
Shooting with a tablet (or phone) is nice, as you have a large viewfinder to see what you are getting. The size of the tablet could play an important role is setting up a way to secure the tablet to a tripod. There are tablet holders available now which work well.
Pro’s:
Large viewing screen.
Easy start and stop.
Can export and share directly from the tablet.
Easy to carry with you.
Con’s:
Need a tablet holder for tripod
May have memory limitations depending tablet
May be harder to control if it’s elevated in the air.
May need additional charging battery
In terms of saving the Tablet video files, you may be able to export the video files from the Tablet to a hard drive/cloud storage like iCloud, Dropbox or Google Drive. If the Tablet does shoot in 4K, you may have the option to export the video in HD to an external storage location as mentioned above to save on storage space.
Small camcorders
I have filmed with a camcorder and it does have some advantages. The zoom lens can adapt to many different environments for framing your shots. The audio is generally good, and many models have swappable SD cards and batteries - allowing you to shoot all day if you come prepared with spares. Some cameras even allow you to control it from your phone via wifi - a definite bonus!
Pro’s:
Zoom lens and good audio
Swappable SD cards and batteries (not all have this feature)
Good optics
Wifi control of start/stop, viewing, and even live-streaming ability (not all)
Cons:
Need to download footage
Need to remember to charge batteries
Possibly a bit more to carry and manage
GoPro line of cameras
I have filmed with GoPros on numerous occasions, and often use them in my professional shoots as birds-eye views or crash cams depending on the situation. GoPros are a great option as they are small and hardy, can be mounted easily on a tripod and elevated above the crowd, and can be controlled with your phone. I would highly recommend powering a GoPro from an external battery which has higher capacity than the GoPro batteries (which typically last about 40-60 minutes). There are a few caveats with the GoPro cameras - while they can shoot 4K and HD, you have to choose if you will shoot with the narrow, wide or super-wide field of view. The wide and super-wide do have a bit of a fisheye effect, bending the horizon to fit the scene in. This can be “fixed” in post production, but it’s often still noticeable - but passable for the intention of the video - letting the coaches see your player play!
Pros:
4K and HD filming
Small camera
Control from your phone or tablet via wifi
Film all day with external battery and large SD card
Easy to mount on a tripod and elevate above the crowd
Lots of mounting hardware options and external batteries
Cons:
Need to download the footage
Wide angle views can have a fisheye effect
Don’t rely on the standard GoPro batteries for more than 1 match
Multiple parts to remember
Preparation is also key before heading out to a match or tournament. I use a checklist to make sure I am ready to successfully record.
Pre-shoot checklist:
Camera lens clean
Have all components - mounting hardware, tripod, chargers, extra batteries, extra SD card
SD cards (if used) formatted and have ample room for all matches
Phones and Tablets have ample storage space available for recording match
Batteries fully charged
Good attitude - the camera will record anything you say - and you don’t want potential coaches or teammates hearing negative sideline commentary :-)
Snack in camera bag in case your blood sugar gets low! :-)
File labelling and camera date/time setting
A quick note about labeling your footage files. It’s very helpful to have a consistent labeling system for your videos. It’s wise to have whichever camera you end up with - have the date/time set accurately - this way you can go back and cross reference match schedules if you need to. One other tip I use is as I start recording a match, I give an audible description of who the opponent is, and if I think of it, the final score at the end. But labeling the matches is helpful. You might consider including the date, tournament name, what day of the tournament it is, and who the opponent is and where they are from.
When it comes to editing, and if you’d like to work with me which I hope you do, you will be sending me a log sheet of the plays you’d like to include, what video file they are on, and where they are in the video with a time reference. So the labeling will be most helpful in this process.
Lastly, if you are looking to buy a camera, I would highly recommend B&H Photo/Video in New York as a vendor and resource of information. You could call them, tell them what you are wanting to do, what cameras you are considering, and ask what they would recommend. They are very helpful, very knowledgable, want you to end up with a camera system that will serve your needs, and have tremendous customer service after the sale should you decide to purchase from them.
One other option I have used and like for my own purposes is a scoring app on my phone. Many times you cannot see the scoring table and the score, so it’s nice to be able to have the score on your phone. I have also used it as a slate at the beginning, sometimes during, and end of the game/match to show final scores. There are a variety of these available.
Please let me know if you have any other questions. I may have provided more information than what you are looking for, but thought I would offer my 2 cents since to help showcase your player.
I hope I have an opportunity to work with you creating a volleyball recruiting video for your player. A recruiting video is a great tool in the recruiting process to be used in part of the best practices. It provides a quick response to coaches who request to see footage of your player, and also provides an avenue for emailing and sharing your video with coaches where your player has an interest in the program and academic offerings. We have been down the recruiting path with two of our kids who went on to play in college - and know that it’s a bit of a wild ride. A recruiting video and good research on what appeals to your player in a college can add control in the process for you.